Your custom WordPress login page is more important than you think! Apart from being the first impression, the doorway to your website, it is the key to productivity and increased work output. How?
Seeing a lively, beautifully designed login page can elevate your energy and inspire creativity. On the other hand, the basic login page might have no effect on your mood at all!
A custom login page adds an appeal and a professional touch to your website, ensuring it stands out! In this article, I’ll show you different ways of creating a custom WordPress login page!
So, let’s start with :
How to Create a Custom WordPress Login Page?
How to Create a Custom Login Page in WordPress with a Plugin?
Well, this here is one of the easiest ways to have a compelling login page that inspires creativity and lightens up your day. Building a custom login page for your WordPress website can be easily done with the help of a plugin!
Choose a Plugin
I’m sure you have a vague idea and a colorful design in mind by now for your login page. But, the plugin you choose should be able to bring this thought into your WordPress login page, right?
So, the first step is to choose a plugin that fuels you to design freely. For this, there are many plugins available, but my top recommendations would be: LoginPress, Login Page UI Customizer, Branda, and User Registration.
You can pick any of the ones and start revamping your WordPress login page!
For the sake of simplicity, let’s build a custom WordPress login page. I’ve taken the Login Page UI Customizer plugin, because of its capabilities to design freely. And of course, it comes with loads of pre-designed templates to pick from!
Install and Activate the Plugin
To install and begin your login page-building journey, navigate to the Plugins page in your WordPress dashboard, and click on the “Add New” button.
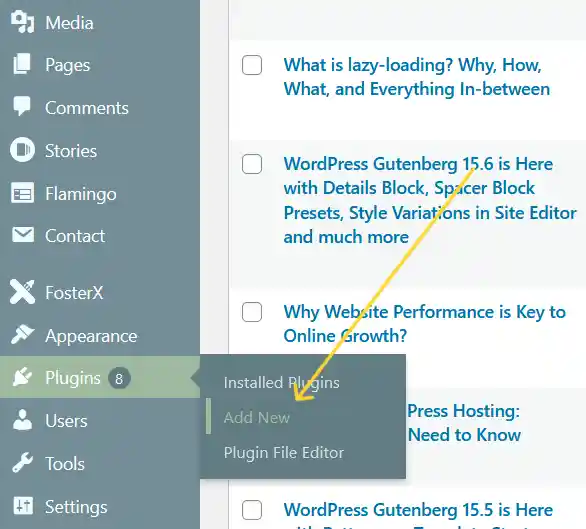
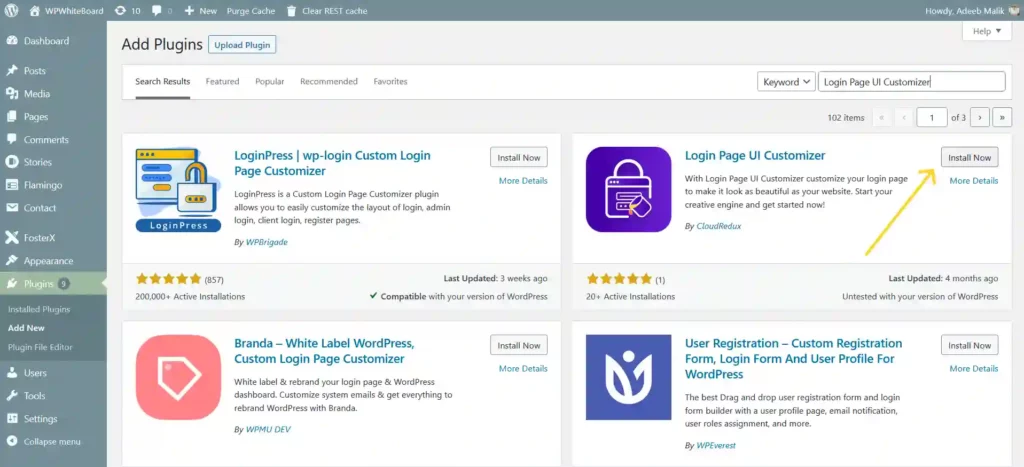
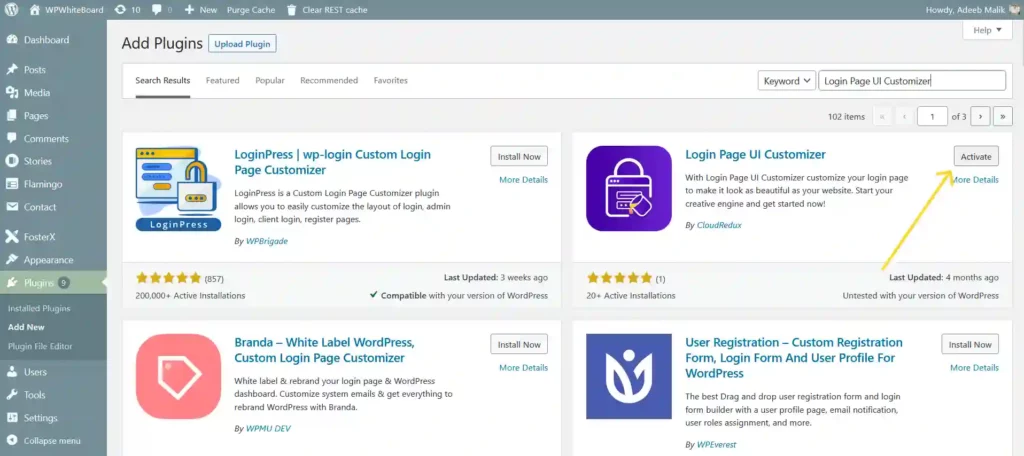
To install the Login Designer plugin, navigate to the Plugins page in your WordPress dashboard and click on the “Add New” button. In the search bar, type “Login Page UI Designer” and hit enter. Click the “Install Now” button next to the Login Page UI Designer, and then click “Activate”.
Customize Your WordPress Login Page
Once activated, you can begin customizing your WordPress login page. Navigate to Appearance > Customize > Login Page UI. You can take your pick from the pre-designed templates or start building the login page from scratch.
If you start from scratch, you get an easy-to-use interface to customize the different elements of your WordPress website’s login page. You get complete control over all the elements like the logo, background image, colors, form fields, etc. So, you get all you need to carve your brand on your website’s login page!
Here’s a video that showcases the plugin, check it out! 🔦
Preview and Save Your Custom WordPress Login Page
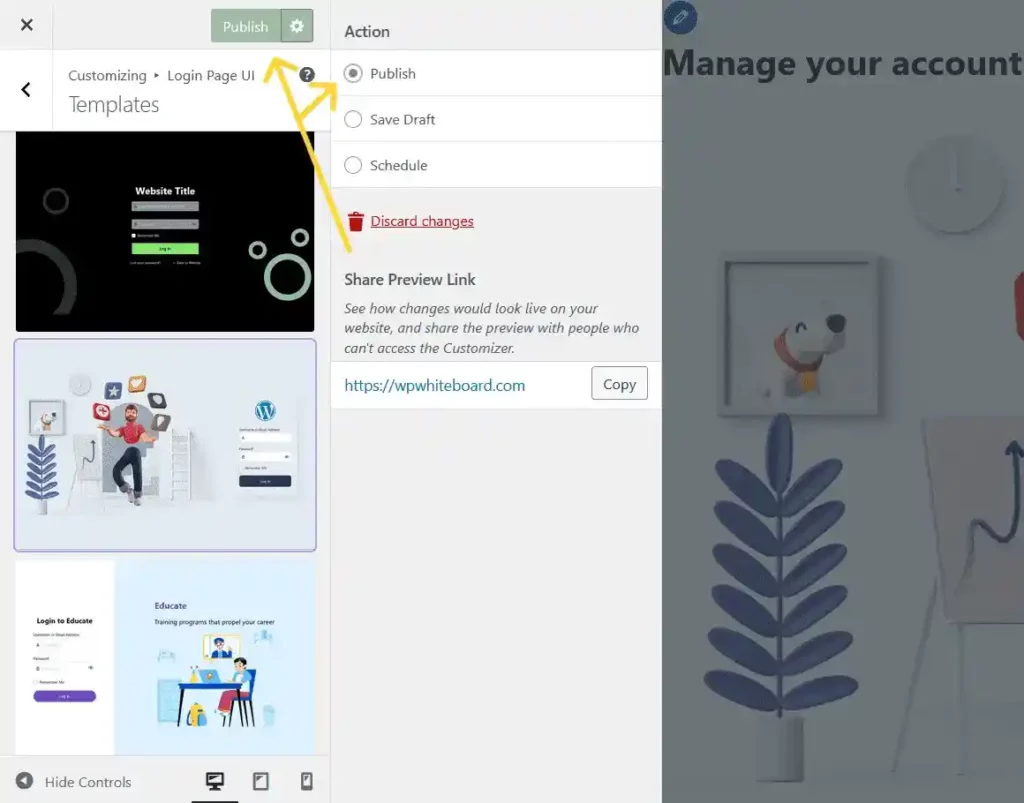
Once you’ve carved your WordPress login page, preview it and ensure everything works correctly and looks outstanding. First, you need to save your design by clicking on the “Save Draft” button.
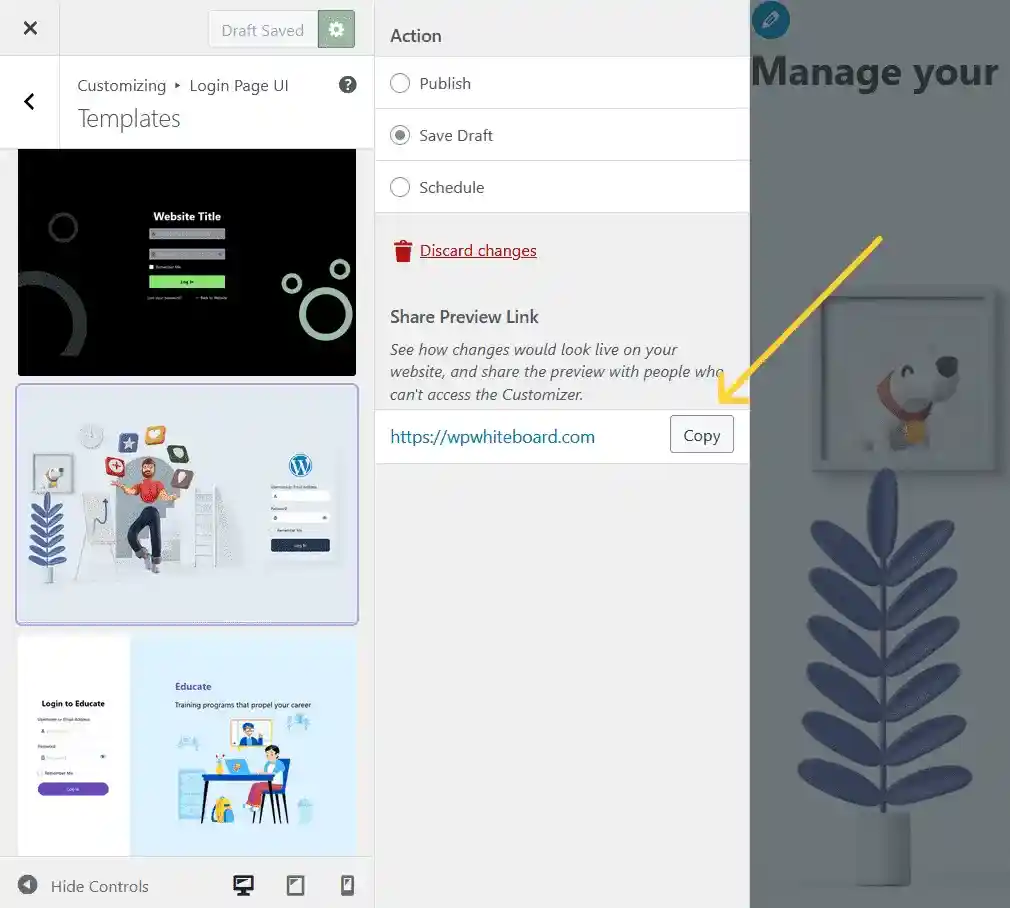
Then right after that, there’s a preview link that will become available for you to preview and take a quick look at your WordPress website’s handcrafted login page. You also get the option to copy the link and share it. So, those who do not have access to the customizer can look at the login page and share their views. Cool, right?
Add Your Custom Login Page to Your Website Finally
If you love what you see, and there’s a shower of compliments and love for the login page, click the “Publish” button to make the design live!
Congratulations, your custom WordPress login page is now alive and kicking!
How to Create a Custom Login Page in WordPress Without a Plugin?
If you’re someone who likes to take the reins of things and wish to create a login page design by yourself, this is your guide. You can create a custom login page in WordPress without a plugin too.
The only thing is that it’d require some coding. But don’t you worry, I’ve got everything you need, all you need to do is follow the process, step-by-step.
Before we go further, first let’s understand the default login form presented to us by WordPress!
WordPress Login Form
When you’re logging in to your WordPress website, a very familiar login form welcomes us. It looks something like this!
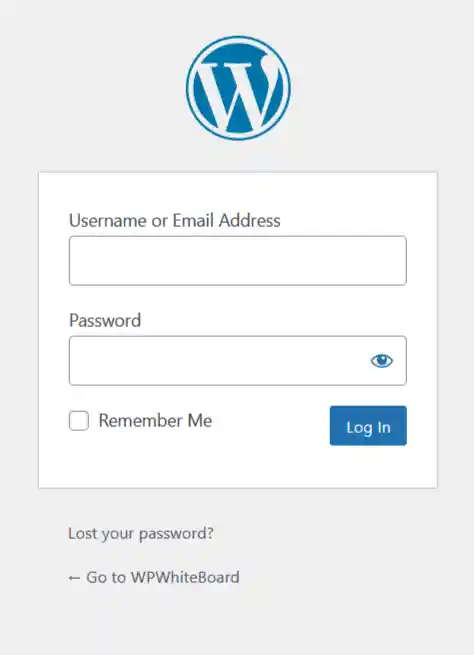
The WordPress logo and link are at the top of the login page, followed by the login form, which includes “Username” and “Password” input fields.
There is a “Remember Me” checkbox. If this option is enabled, your browser will keep you logged in for 14 days. (If this option is not selected, you will be logged out when you close the browser or after two days.)
The “Log In” button is used to submit form input.
There are two links below the form: The first is for registered users who have lost their password. The other is for your WordPress site’s front page.
This single login form can perform three functions:
- Input fields for “Username” and “Password”.
- A “Remember Me” checkbox. If checked, your browser keeps you logged in for 14 days. (If unchecked, you’re logged out when you quit the browser, or after two days.)
- The “Log In” button for submitting the form data.
Below the form are two links: One is for registered users who’ve forgotten their password. The other goes to the front page of your WordPress site.
This one login form can do three things:
- Log into a site (by filling in a valid Username and Password).
- Email a password to a registered user (by clicking the Lost your password? (link: wp-login.php?action=lostpassword).
- Register new users (who’ve arrived at this form by clicking a Register (link: wp-login.php?action=register).
Customizing the WordPress Login Page
Much of the WordPress login page can be easily changed with WordPress Plugins (search for “login”). It can also be changed by manually adding code to the WordPress Theme’s functions.php file.
Change the Login Logo
To change the WordPress logo to your own, you will need to change the CSS styles:
<h1><a href="https://wordpress.org/">Powered by WordPress</a></h1>WordPress uses CSS to display a background image – the WordPress logo – in the link (<a>) inside the heading tag (<h1>). You can use the login_enqueue_scripts hook to insert CSS into the head of the login page so your logo loads instead. To use the code below, replace the file named site-login-logo.png with the file name of your logo, and store your logo with your active Theme files in a directory named /images:
function my_login_logo() { ?>
    <style type="text/css">
        #login h1 a, .login h1 a {
            background-image: url(<?php echo get_stylesheet_directory_uri(); ?>/images/site-login-logo.png);
		height:65px;
		width:320px;
		background-size: 320px 65px;
		background-repeat: no-repeat;
        	padding-bottom: 30px;
        }
    </style>
<?php }
add_action( 'login_enqueue_scripts', 'my_login_logo' );Note: Do mention the exact height and width of the background image that you wish to upload. In the above code, it is height:65px and width:320px and cjhange the same in the background size accordingly.
The size of your logo should be no bigger than 80×80 pixels (though even this can change with custom CSS). Adjust the above padding-bottom value to the spacing you want between your logo and the login form.
To change the link values so the logo links to your WordPress site, use the following WordPress hooks example; edit it and paste it below the previous in the functions.php:
function my_login_logo_url() {
    return home_url();
}
add_filter( 'login_headerurl', 'my_login_logo_url' );

function my_login_logo_url_title() {
    return 'Your Site Name and Info';
}
add_filter( 'login_headertext', 'my_login_logo_url_title' );
Styling the Login Form
CSS may be used to style any HTML element on the WordPress login page. Use a function like my login logo to apply styles to the head> of your login page. Styles declared within a page’s head element are referred to as an “embedded style sheet” and take precedence over styles declared in linked external style sheets.
If you have a number of different login page styles, you should create your own custom login style sheet. When you add this code to your functions.php file, it will load a CSS file called style-login.css, which is saved among your active Theme files:
function my_login_stylesheet() {
    wp_enqueue_style( 'custom-login', get_stylesheet_directory_uri() . '/style-login.css' );
    wp_enqueue_script( 'custom-login', get_stylesheet_directory_uri() . '/style-login.js' );
}
add_action( 'login_enqueue_scripts', 'my_login_stylesheet' );
WordPress uses the CSS style sheet wp-admin.css to insert the logo and to hide the heading text with text-indent:-9999px;
.login h1 a {
	background-image: url('../images/w-logo-blue.png?ver=20131202');
	background-image: none, url('../images/wordpress-logo.svg?ver=20131107');
	background-size: 80px 80px;
	background-position: center top;
	background-repeat: no-repeat;
	color: #999;
	height: 80px;
	font-size: 20px;
	font-weight: normal;
	line-height: 1.3em;
	margin: 0 auto 25px;
	padding: 0;
	text-decoration: none;
	width: 80px;
	text-indent: -9999px;
	outline: none;
	overflow: hidden;
	display: block;
}
Using a more specific selector in your custom style sheet overrides the above background-image value, inserting your logo instead:
body.login div#login h1 a {
    background-image: url("images/site-logo.png");
}
The text color of the links that are below the form in the default login page style is in the colors.css file.
.login #nav a,
.login #backtoblog a {
	text-decoration: none;
	color: #999;
}
To override that, increase the specificity and include !important:
body.login div#login p#nav a,
body.login div#login p#backtoblog a {
    color: #0c0 !important; /* Your link color. */
}
Login Hooks
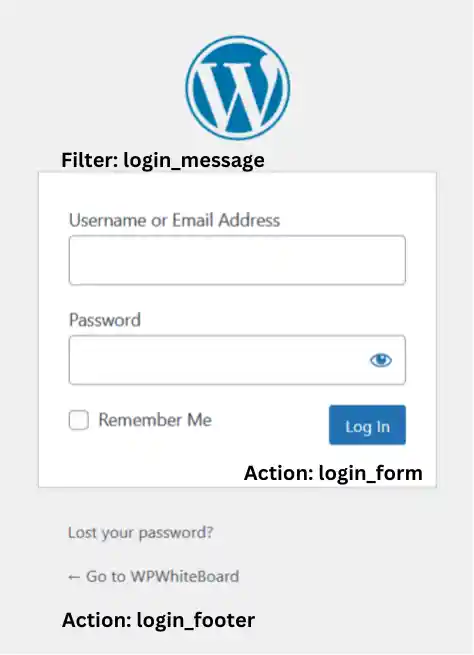
You can customize your WordPress login page with action hooks and filter hooks, including:
- Actions in the <head> of the document: login_enqueue_scripts, login_head.
- Filters in the <body>: login_headerurl, login_headertitle, login_message, login_errors.
- Actions at the bottom of and below the form: login_form, login_footer.
The image to the right shows where several of the hooks can add content.
The above hooks run when using the form to log in. Others are meant for registration, password retrieval, and WordPress Plugins.
The WordPress file wp-login.php generates the HTML, containing the location and sequence of all the login page hooks.
Make a Custom Login Page
So far, you’ve seen how to modify WordPress’ default login page. You may also make your own custom login page by incorporating the wp_login_form function into one of your WordPress Theme’s Page Templates:
<?php wp_login_form(); ?>The function includes numerous parameters for modifying the default values. For example, you can set the form’s and its elements’ ID names (for CSS style), whether to print the “Remember Me” checkbox, and the URL a user is moved to after a successful login (the default is to stay on the same Page):
<?php
if ( ! is_user_logged_in() ) { // Display WordPress login form:
    $args = array(
        'redirect' => admin_url(),
        'form_id' => 'loginform-custom',
        'label_username' => __( 'Username custom text' ),
        'label_password' => __( 'Password custom text' ),
        'label_remember' => __( 'Remember Me custom text' ),
        'label_log_in' => __( 'Log In custom text' ),
        'remember' => true
    );
    wp_login_form( $args );
} else { // If logged in:
    wp_loginout( home_url() ); // Display "Log Out" link.
    echo " | ";
    wp_register('', ''); // Display "Site Admin" link.
}
?>
The function parameters are:
- After logging in, redirect the user to the Administration Dashboard Screen.
- Set the form’s ID name: id=”loginform-custom”.
- Change the text labels for the form elements (for example, from “Username” to “Username custom text” in this example).
- Print the “Remember Me” checkbox.
The form does not print if the user is already logged in; instead, they see two links: Log Out | Site Administrator.
The filters on this login form are login_form_top, login_form_middle, and login_form_bottom. As seen in the graphic on the right, each may print text in the form.
The form is generated by code in the wp-includes/general-template.php file of WordPress. The same CSS stylesheets do not apply because your custom login Page differs from the built-in WordPress login page (wp-login.php). However, your active theme’s stylesheet (style.css) applies, so use that to style this form.
Other template tags related to login functions are, wp_logout_url, wp_loginout, wp_lostpassword_url, login_redirect, and wp_register.
Why Do You Need a Custom Login Page in WordPress?
WordPress comes with a built-in default login page that enables users to access the admin area of a website. However, creating a custom login page that is specific and tailored to your website can have many benefits. Here are a few reasons why you should consider creating a custom login page in WordPress:
1. Branding and Design Consistency
A custom login page allows you to maintain branding consistency across your entire website. You can customize the login form’s appearance, including the logo, background, colors, and typography, to match your website’s overall design. This helps create a seamless user experience and reinforces your brand identity.
2. Enhanced Security
Using a custom login page can enhance the security of your WordPress site. By modifying the login URL or implementing additional security measures, such as two-factor authentication, you can protect against brute-force attacks and unauthorized access attempts. This added layer of security can help safeguard your website and sensitive user data.
3. Improved User Experience
A custom login page can provide a better user experience for your site’s members or customers. You can streamline the login process by adding additional fields or integrating social login options, allowing users to log in with their existing social media accounts. By making it easier for users to access their accounts, you can encourage engagement and reduce login-related friction.
4. Membership Sites or User-Specific Content
If you run a membership site or offer user-specific content, a custom login page is essential. It enables you to create a personalized login experience for your members, providing access to restricted content, exclusive features, or account management options. This tailored login process can enhance the sense of community and deliver a more tailored experience for your users.
5. Developer Flexibility and Customization
Creating a custom login page gives you more control and flexibility over the login process. As a developer, you can extend the functionality of the login page to meet specific requirements, integrate third-party services, or hook into custom authentication mechanisms. This level of customization allows you to align the login process with your unique website needs.
Sign-Off in Style with a Custom Login Page in WordPress
Creating a custom WordPress login page can help improve the security and aesthetics of your website. Whether you choose to use a plugin or code to create your custom login page, it’s important to ensure that it’s functional, visually appealing, and matches your website’s branding.
By following the steps outlined in this article, you can create a custom login page that will help your website stand out and make a positive impression on your visitors. You can also check out how you can build a modern-day high-end website in WordPress.
Because you only log in once a day, but as they say, it’s the little things that have the biggest impact. “A beautiful and aesthetic WordPress login page does have its impact in many ways than you can imagine” (Source: Trust me, Bro!).
Delve into the realm of website building, customization, and optimization, in the form of how-to articles on WPWB and explore diverse topics. Stay up to date with the ever-evolving WordPress and create stunning websites. Subscribe today for a weekly WordPress dose of inspiration and curated resources!
FAQs
To create a custom login page in WordPress without a plugin, you can incorporate the wp_login_form function into one of your WordPress Theme’s Page Templates. This function allows you to generate a login form with customizable parameters, such as form ID, labels, and redirection after login. You can also use hooks and custom CSS styles to further customize the appearance of the login page.
Yes, you can customize the login page in WordPress. WordPress provides several methods to customize the login page according to your preferences. Here are a few common ways to customize your WordPress login page:
1. Using a Plugin: WordPress offers a wide range of plugins that allow you to customize the login page without writing code. Plugins like “Login Page UI Customizer”, “LoginPress”, etc. provides a user-friendly interface to modify the login page’s appearance, such as adding a logo, changing colors, and adjusting background images.
2. Using Custom CSS: WordPress allows you to add custom CSS styles to your theme. By targeting the login page elements with CSS selectors, you can modify the styling of the login form, logo, background, and other elements. This method requires some knowledge of CSS, but it gives you more control over the design.
3. Creating a Custom Login Page Template: For advanced customization, you can create a custom login page template in your theme. By duplicating the existing login template and modifying the HTML and PHP code, you can customize the login page’s structure and functionality. This approach requires development skills and a deeper understanding of WordPress theme development.
4. Using WordPress Hooks: WordPress provides hooks and filters that allow you to modify the login page’s behavior and appearance programmatically. By utilizing hooks like login_enqueue_scripts and login_header, you can add custom scripts, styles, or even replace the entire login page with a custom template.
These methods provide varying levels of customization, from simple visual changes to more advanced modifications. Choose the approach that best suits your skill level and the level of customization you require for your WordPress login page.
To style a login page in WordPress, you have several options depending on your level of customization and coding skills. Here are a few common methods:
1. Using a Plugin: There are WordPress plugins available that allow you to customize the login page’s appearance without writing code. Plugins like “Custom Login Page Customizer” or “LoginPress” provide a user-friendly interface to modify the login page’s styling. You can typically change the background, logo, colors, fonts, and more using these plugins.
2. Custom CSS: WordPress provides a built-in feature to add custom CSS styles to your theme. You can use this feature to target the login page elements and modify their appearance. To do this, navigate to “Appearance” -> “Customize” in your WordPress admin panel, and look for the “Additional CSS” or similar option. Add your CSS rules there to style the login page. For example, you can change the form’s background color, font size, or add custom logos.
3. Creating a Custom Login Page Template: If you have coding skills and want more control over the login page’s structure and functionality, you can create a custom login page template in your theme. To do this, duplicate the existing login template (wp-login.php) and modify the HTML and PHP code as needed. You can add your custom CSS styles directly within the template file or enqueue a separate CSS file to style the login page.
4. Using WordPress Hooks: WordPress provides hooks and filters that allow you to modify the login page’s behavior and appearance programmatically. By utilizing hooks like login_enqueue_scripts and login_header, you can add custom CSS styles or replace the entire login page with a custom template. This method requires more advanced development skills but provides complete control over the login page’s styling.
Remember to create a child theme or use a custom plugin to implement any code changes so that your modifications are not lost during theme or plugin updates.